
Wood is a wonderful material for fall decorating because its natural texture already feels warm, rustic, and inviting. Even a few leftover boards or wood slices can become pumpkins, signs, lanterns, trays, or seasonal wall art.
This collection includes simple fall wood crafts for beginners as well as larger weekend woodworking projects. Many ideas can be customized with stain, paint, stencils, ribbon, greenery, or reclaimed lumber to match farmhouse, cottage, rustic, traditional, or modern homes.
Below, you will find 21 practical projects, advice for preparing and finishing wood, a difficulty comparison, shopping checklist, autumn color palettes, tool-safety guidance, and easy ways to give budget lumber a polished appearance.
More Fall Decorating Inspiration
Quick List of Fall Wood Projects
- Stacked wood block pumpkins
- Rustic porch welcome sign
- Wood slice pumpkin ornaments
- Scrap wood leaf mosaic
- Pumpkin-shaped serving tray
- Wooden fall lanterns
- Mini harvest crate
- Fall blanket ladder
- Wood bead pumpkin wreath
- Autumn cutting-board sign
- Wooden pumpkin centerpiece box
- Tiered tray display stand
- Oversized wooden acorns
- Reclaimed wood scarecrow
- Wood slice candle platform
- Pumpkin patch directional signs
- Wooden fall house village
- Leaf-shaped wall hooks
- Rustic wood pedestal stand
- Mini wooden wheelbarrow
- Outdoor pumpkin planter box
How to Prepare Wood for Fall Crafts
Choose clean, dry wood without active rot, major cracks, protruding nails, or insect damage. Reclaimed wood can add beautiful character, but it should be inspected carefully and cleaned before it enters your home or workshop.
Measure every project twice and mark cuts clearly with a square and pencil. After cutting, sand the faces, edges, and corners until they feel smooth. Begin with a medium grit when needed and finish with a finer grit appropriate for your wood and chosen finish.
Remove all sanding dust before applying paint or stain. Use a primer when the paint or wood requires it, and test stains on an offcut because different boards can absorb the same color differently.
Choose fasteners and adhesives according to the project’s weight, location, and intended use. Decorative indoor crafts have different requirements from furniture, planters, outdoor signs, and anything expected to carry weight.
Smooth wood base + one seasonal shape + warm finish + natural texture + one practical display location
Choosing a Fall Woodworking Project
| Style or Area | Best Pieces to Use | Why It Works |
|---|---|---|
| Beginner Craft | Block pumpkins, ornaments, signs, and wood houses | Mostly straight cuts and simple painted finishes keep the process manageable. |
| Front Porch | Welcome sign, planter, lanterns, and directional signs | Large wooden pieces remain visible from the sidewalk and add height. |
| Dining Table | Centerpiece box, pedestal, wood slice platform, and tray | Low horizontal projects organize pumpkins, flowers, and flameless candles. |
| Mantel or Shelf | Wood houses, acorns, pumpkins, and miniature crates | Compact pieces introduce seasonal shapes without overcrowding the surface. |
| Useful Storage | Crate, centerpiece box, hooks, and tray | The finished project remains practical after the season ends. |
| Weekend Build | Blanket ladder, wheelbarrow, tiered stand, and planter | These projects use more measuring, assembly, and structural planning. |
Cozy Fall Woodworking Projects to Make This Season
1Build Stacked Wood Block Pumpkins
 Cut scrap boards or square posts into several short blocks and sand every surface. Stack two or three blocks horizontally to create each pumpkin, staggering their edges slightly so the finished shape feels handmade rather than perfectly square.
Paint the blocks muted orange, cream, sage, rust, or warm brown. Add a small wood stem, jute bow, and faux leaf at the top, then make several sizes for a mantel, shelf, porch step, or table centerpiece.
2Make a Rustic Fall Porch Sign
 Sand a long board and finish it with paint, stain, or a weathered dry-brush effect. Add a vertical pumpkin, leaf, sunflower, or harvest design using a stencil or carefully transferred outline.
Keep the main shapes large enough to be seen from the walkway. Add a removable fall wreath or ribbon near the top so the board can be restyled for another season instead of remaining a single-use project.
Amazon find: Fall Craft Stencil Set
Reusable stencils help create clean pumpkins, leaves, acorns, and harvest patterns on signs, trays, blocks, and planter boxes.
3Paint Wood Slice Pumpkin Ornaments
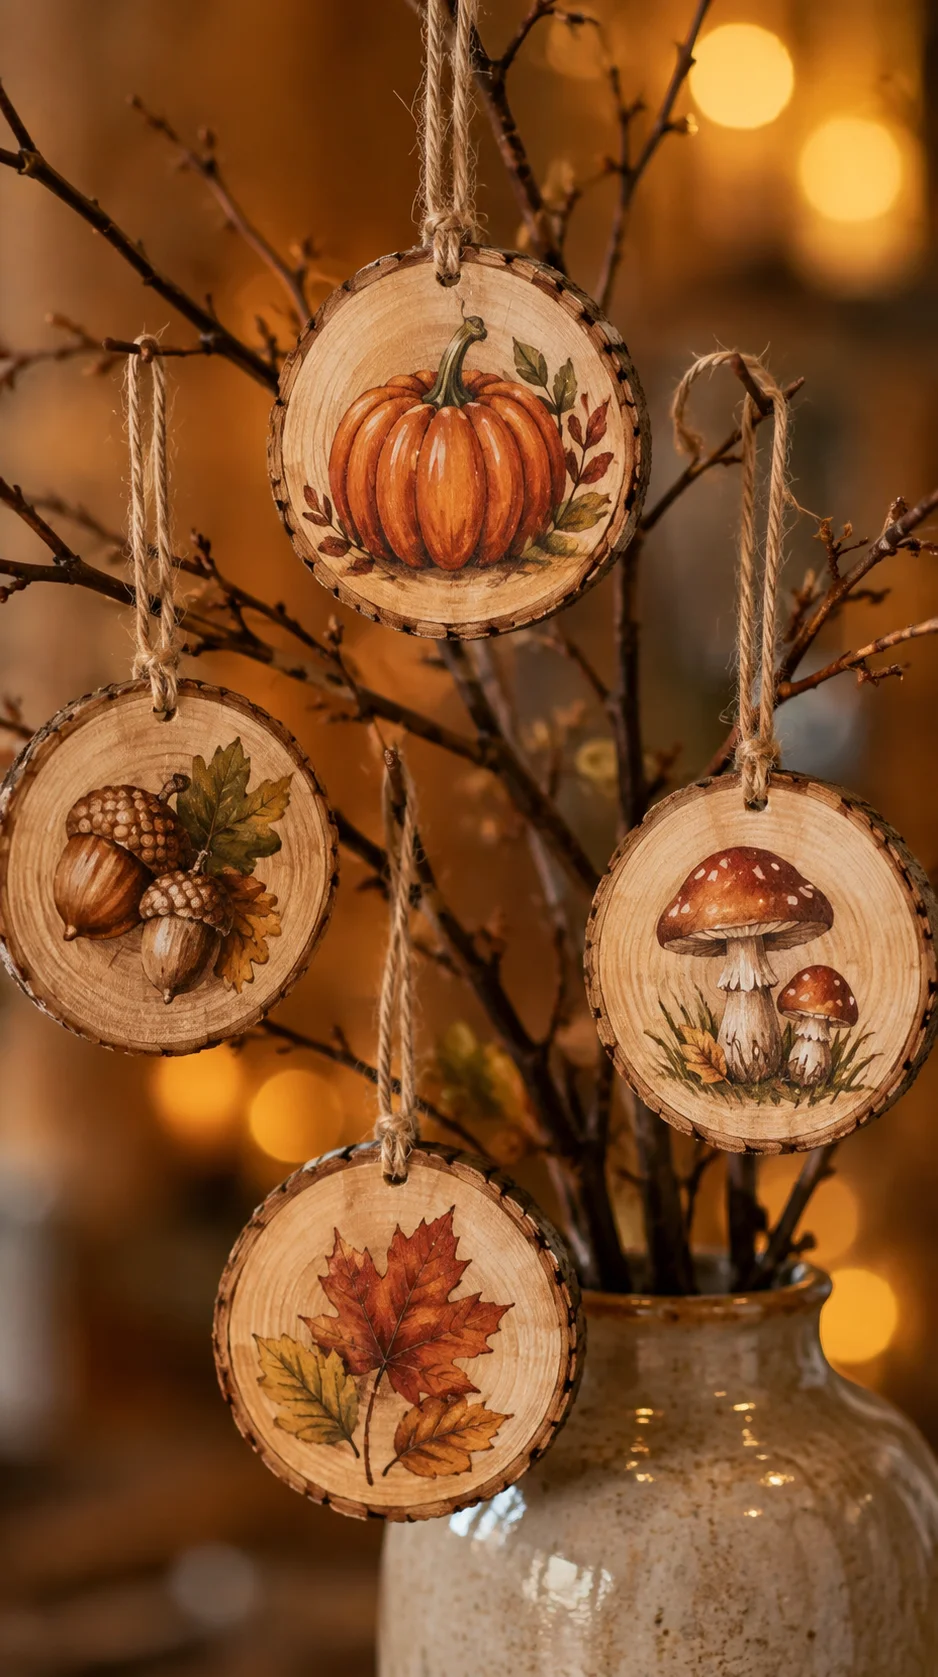 Choose smooth wood slices with predrilled holes or carefully drill suitable slices before decorating. Paint simple pumpkins, acorns, mushrooms, leaves, or woodland scenes on one side while allowing part of the natural wood grain to remain visible.
Thread the ornaments with jute twine, suede cord, or narrow velvet ribbon. Hang them from decorative branches, cabinet knobs, fall garlands, wrapped gifts, napkin rings, or an indoor seasonal tree.
4Create a Scrap Wood Leaf Mosaic
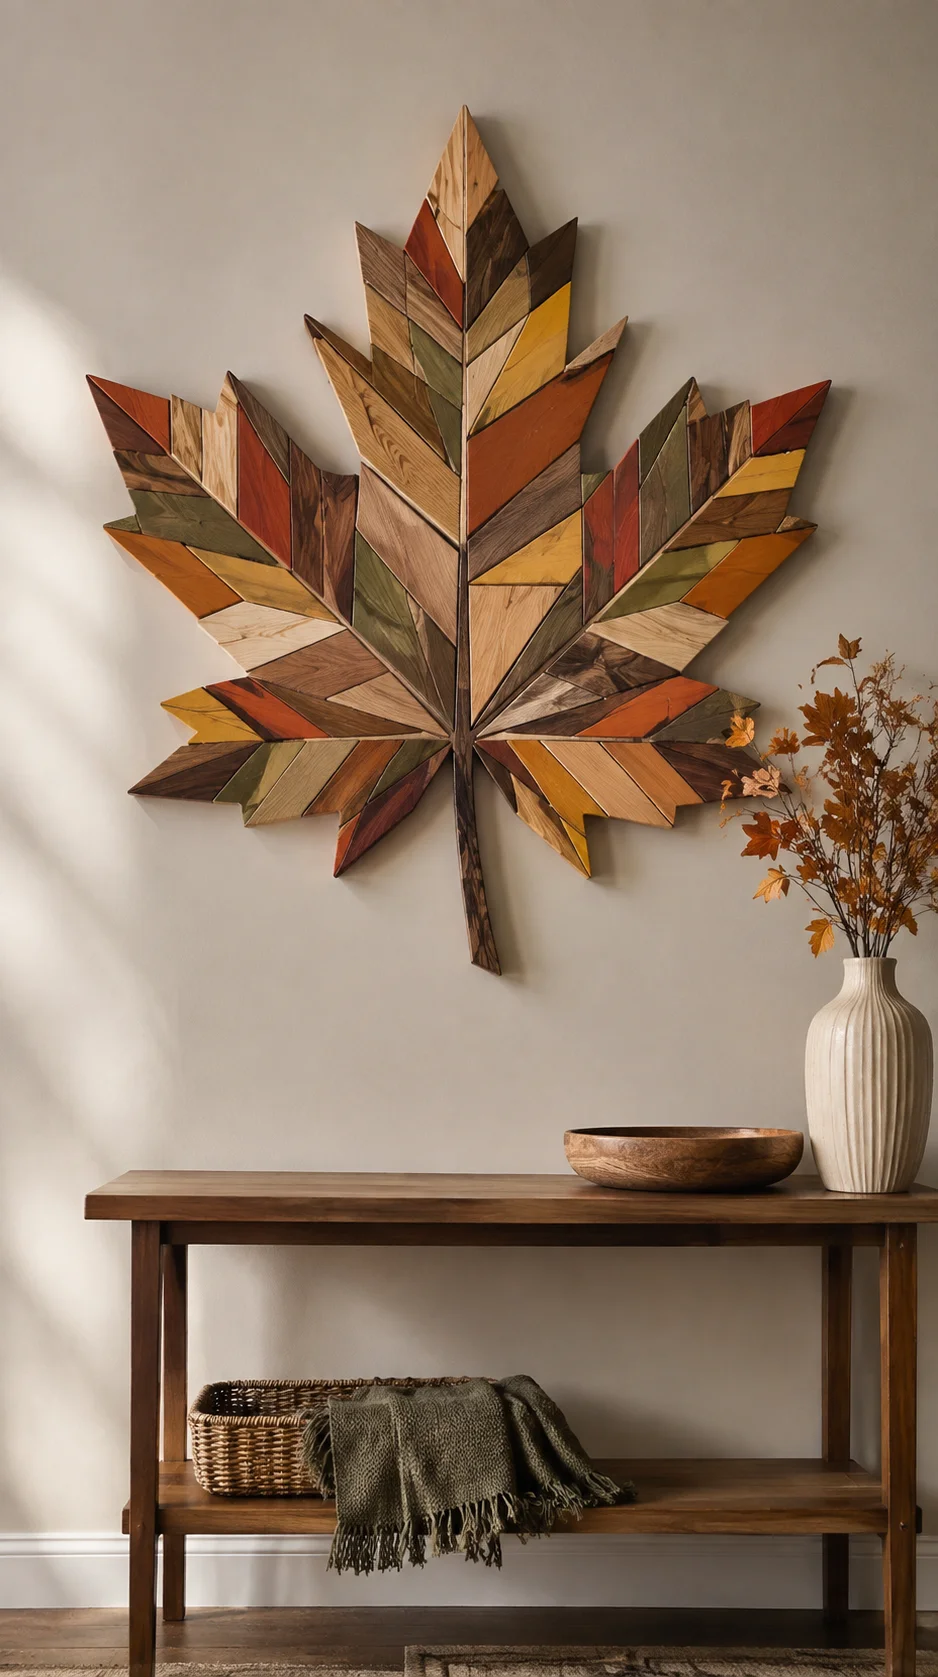 Cut thin scrap wood into small geometric pieces and arrange them inside a large maple or oak leaf outline on a sturdy backboard. Use varying wood tones or paint selected pieces in muted fall colors before assembly.
Dry-fit the complete mosaic before applying adhesive. Leave a small consistent gap between pieces or fit them closely together, depending on whether you prefer a modern geometric look or a more rustic patchwork effect.
Amazon find: Wood Glue for Indoor Craft Projects
Appropriate wood glue helps secure lightweight mosaic pieces, stacked pumpkins, small houses, and other indoor assemblies.
5Cut a Pumpkin-Shaped Decorative Tray
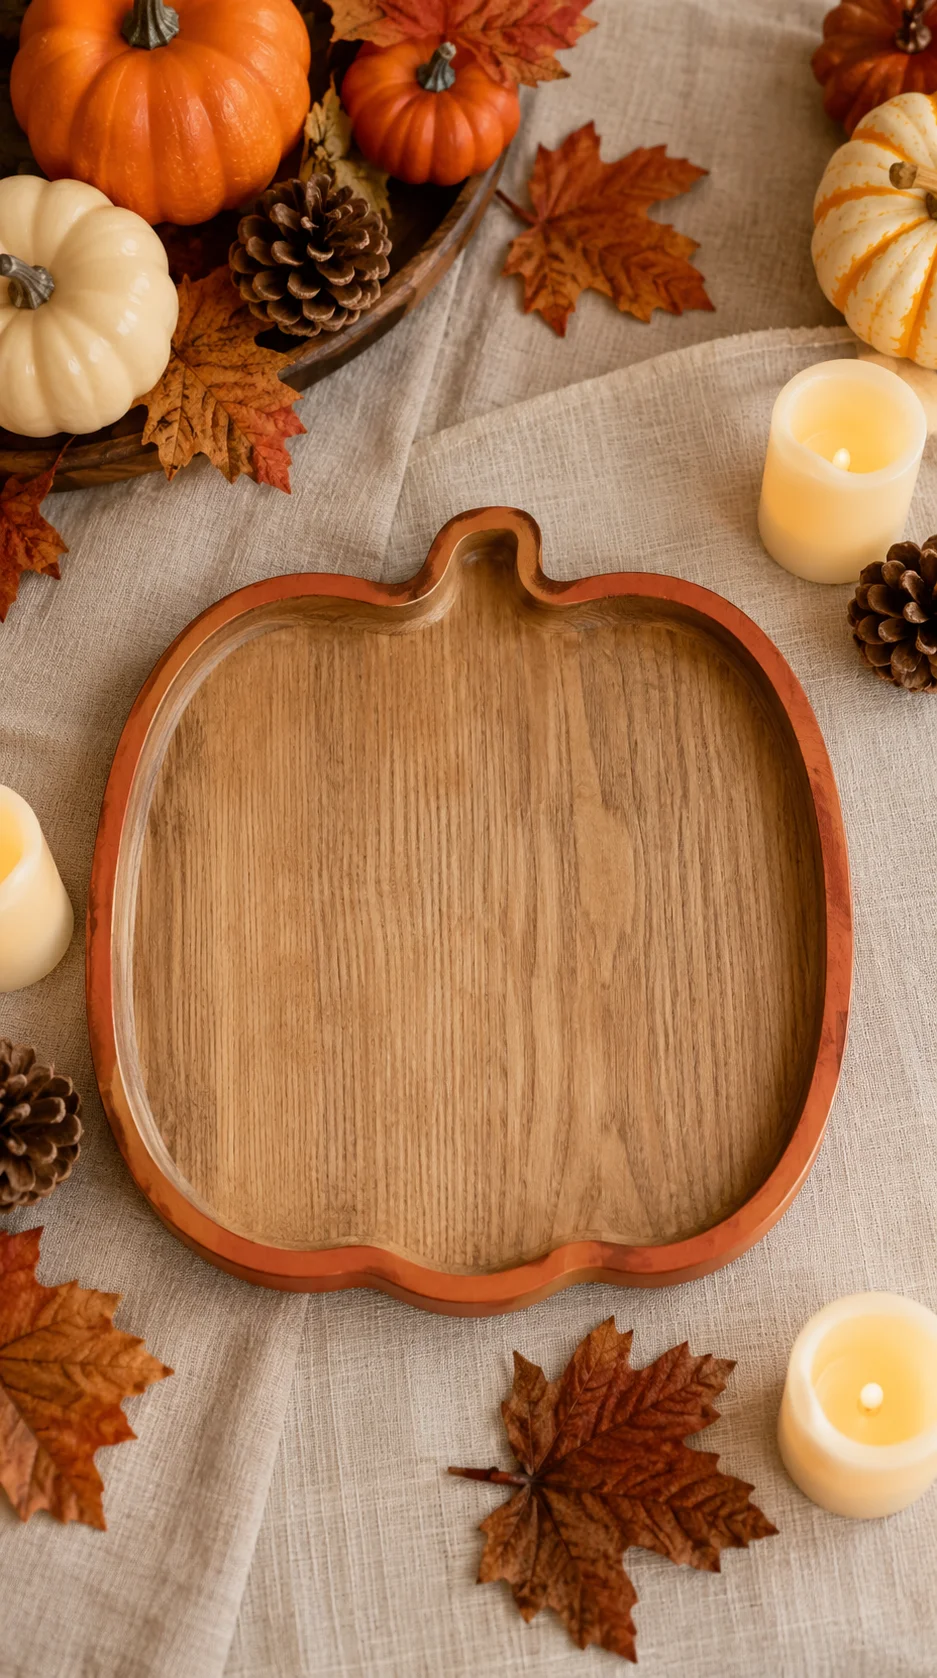 Trace a wide pumpkin shape onto a suitable wood panel and cut it with the appropriate saw. Smooth the curves carefully and add a shallow wood rim or small handles if you have the tools and experience to assemble them securely.
Stain the pumpkin, paint it a warm neutral, or leave the center natural and paint only the edge. Style it with lightweight decorative objects such as faux pumpkins, leaves, pinecones, or flameless candles.
6Assemble Wooden Fall Lanterns
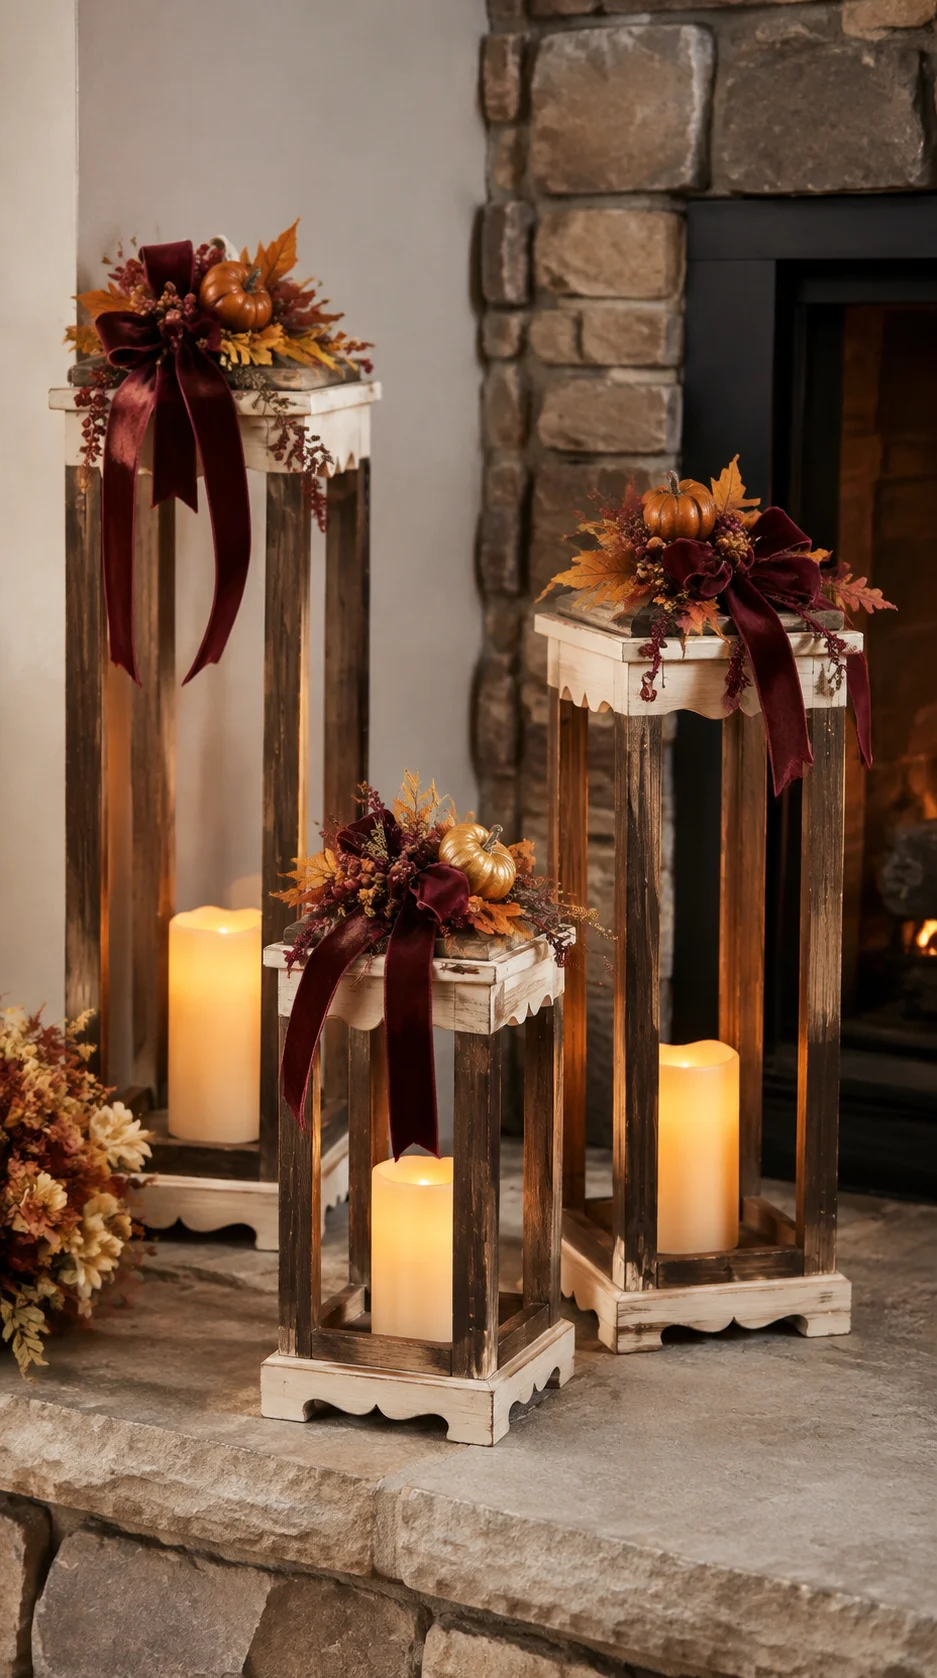 Build simple open lantern frames from square wood strips and attach them to sturdy top and bottom panels. Check every frame for square before the adhesive or fasteners are fully set.
Stain the lanterns in a warm wood tone or paint them cream, black, or muted green. Place battery-operated candles inside and decorate the top with removable ribbon, leaves, berries, or a miniature pumpkin.
7Build a Mini Harvest Crate
 Create a small rectangular crate from thin boards or wood strips, leaving narrow gaps between the side slats. Sand each component before assembly because the inside corners may be harder to reach later.
Finish the crate with stain, paint, or a distressed dry-brush effect. Fill it with faux apples, miniature pumpkins, folded napkins, seasonal cards, or craft supplies, keeping the contents appropriate for the crate’s construction.
Amazon find: Small Woodworking Clamps
Compact clamps hold crate sides, frames, boxes, and small glued components in position while the adhesive cures.
8Make a Decorative Fall Blanket Ladder
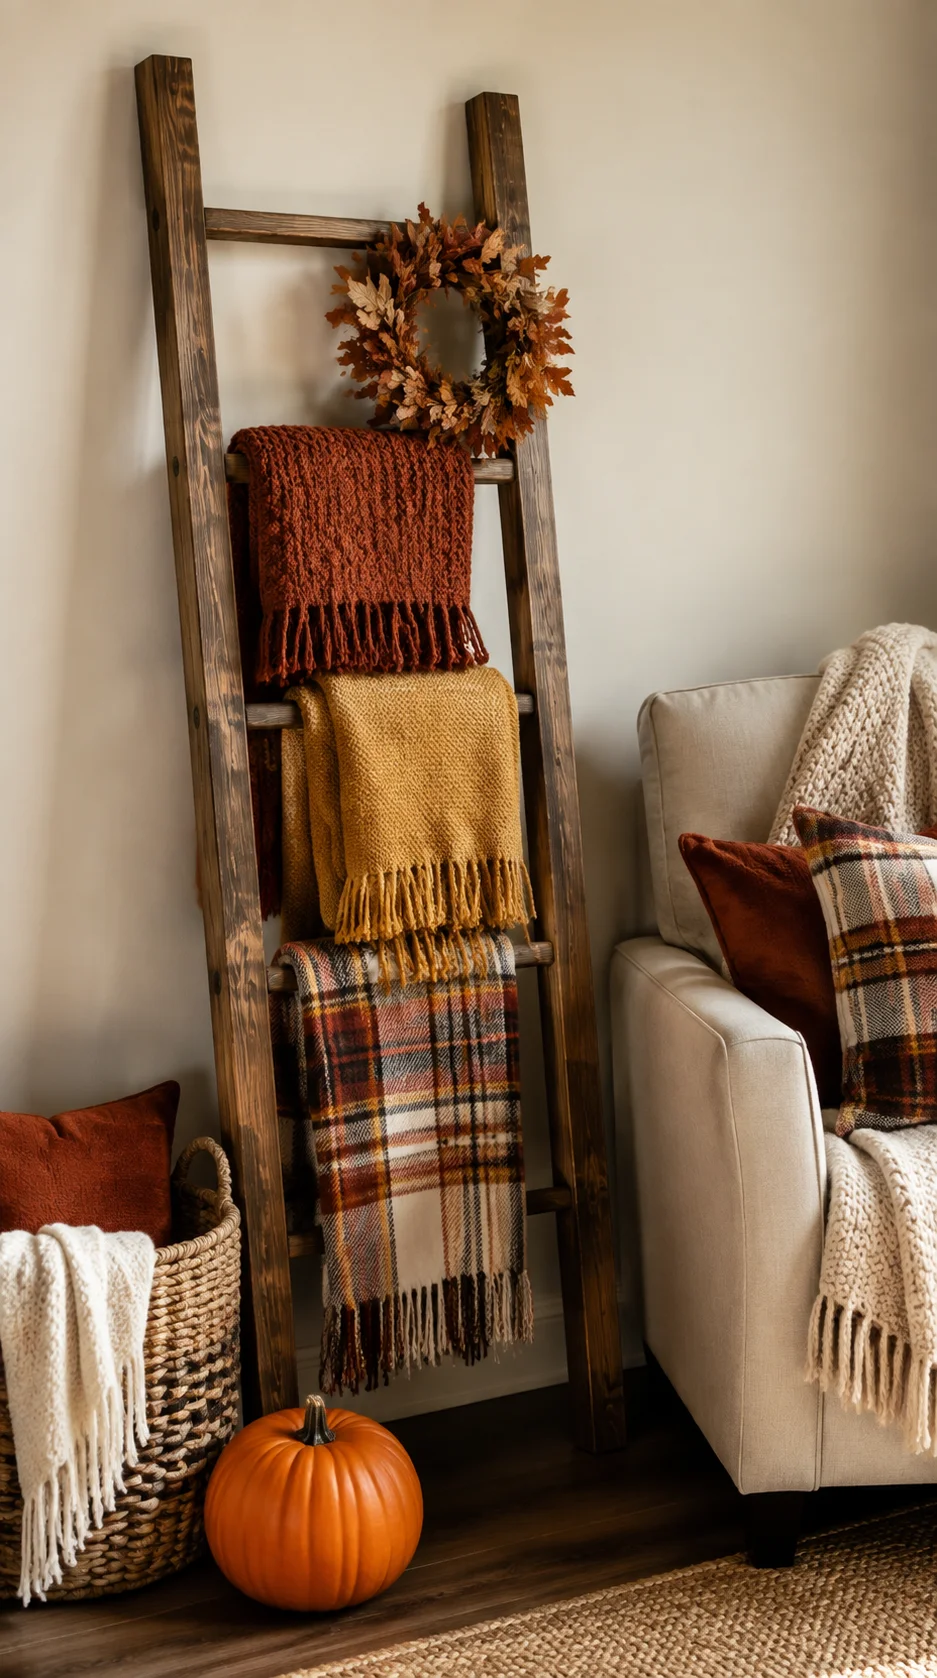 Cut two long side rails and several evenly sized rungs. Mark every rung position using a tape measure and square, then assemble the ladder according to an appropriate woodworking plan for your tools and materials.
Sand the finished ladder thoroughly and apply stain or paint. Lean it securely in a low-traffic area and decorate it with lightweight throws, a small fall wreath, or a fabric garland.
9Shape a Wood Bead Pumpkin Wreath
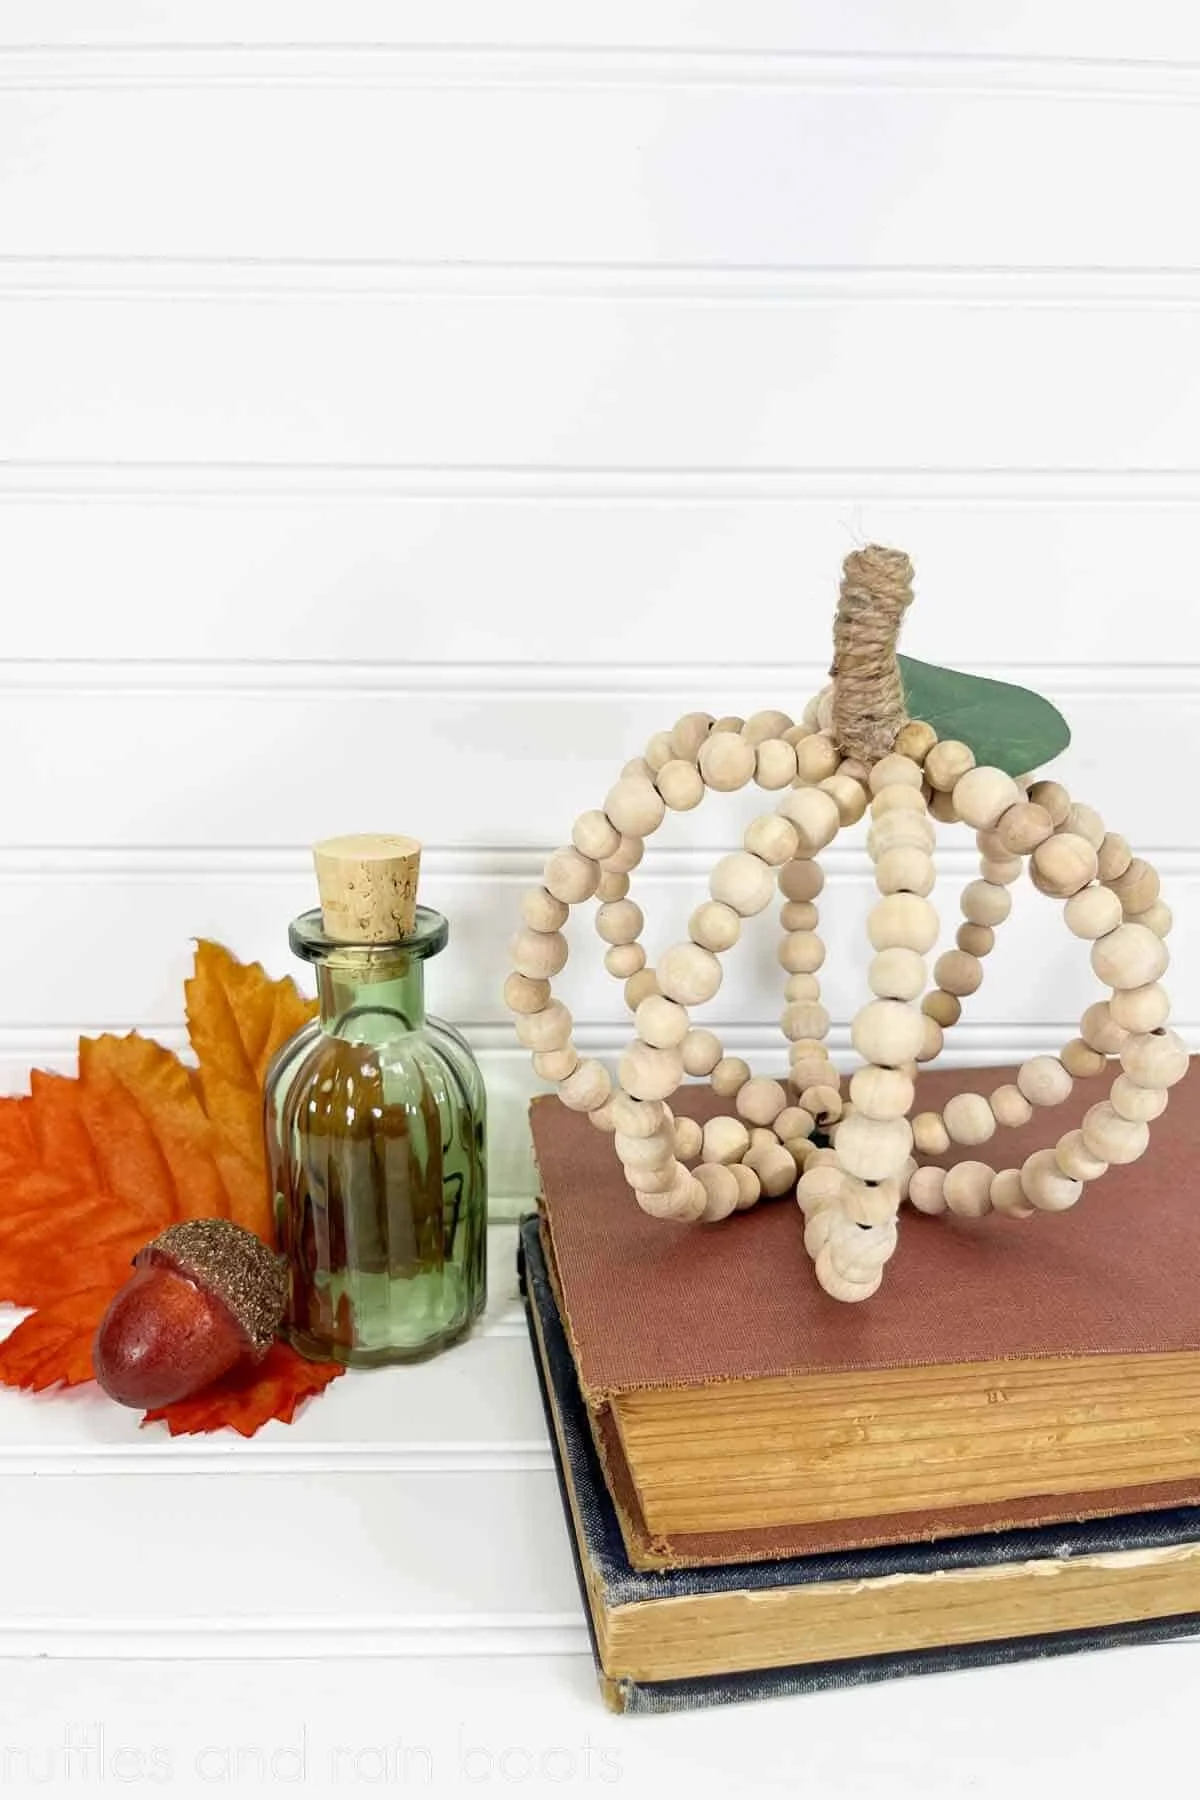 String large unfinished wood beads onto sturdy craft wire and shape the strand into a pumpkin outline. Secure the wire carefully, then add a short wood stem at the top.
Leave the beads natural or paint them cream, sage, orange, or brown. Finish the stem with a velvet bow, dried-look leaves, or a small greenery cluster and hang the lightweight wreath indoors or on a covered door.
Amazon find: Large Unfinished Wood Craft Beads
Unfinished beads can be stained, painted, or left natural for pumpkin wreaths, garlands, hangers, and tray accents.
10Decorate an Autumn Cutting-Board Sign
 Use a new unfinished cutting-board blank or repurpose a damaged board that is no longer suitable for food preparation. Sand it smooth and add a pumpkin, wheat, apple, acorn, or leaf design.
Tie ribbon or greenery through the handle and display the board against a kitchen backsplash, inside a shelf arrangement, or on a wall hook. Keep the artwork simple so some natural wood remains visible.
11Build a Wooden Pumpkin Centerpiece Box
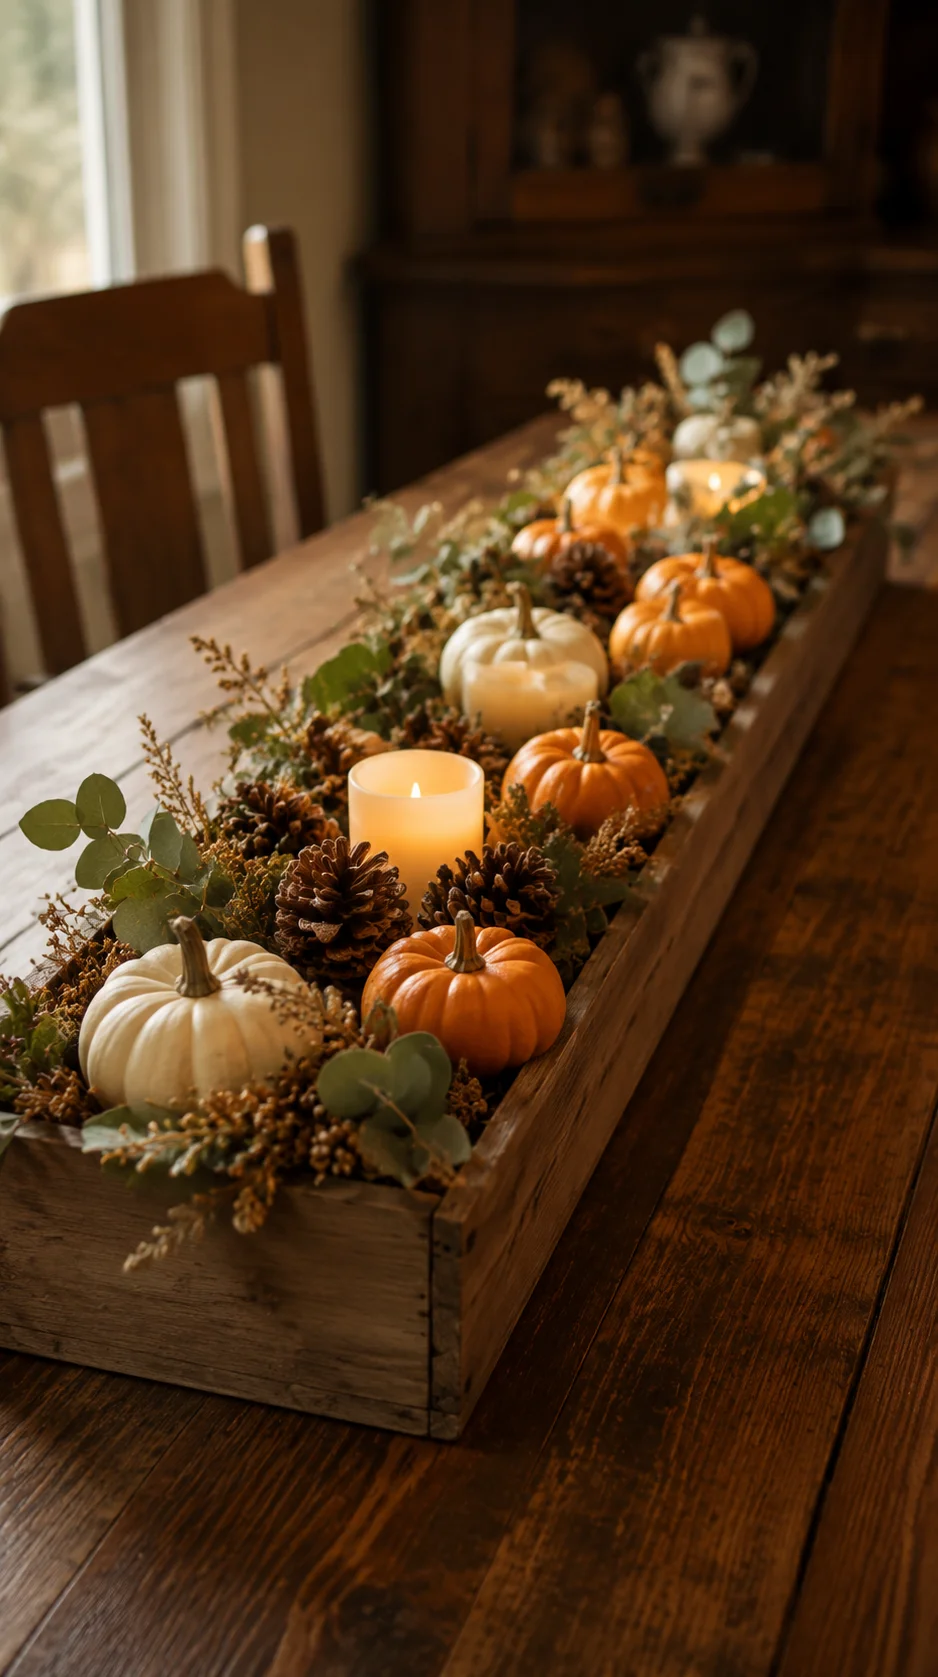 Construct a long, narrow open box that fits the proportions of your dining table. Sand the inside and outside, then stain it or paint it in a color that coordinates with your room.
Fill the box with miniature faux pumpkins, pinecones, eucalyptus, dried-look stems, or flameless candles. Keep the arrangement low enough that seated guests can see one another across the table.
12Assemble a Fall Tiered Tray Stand
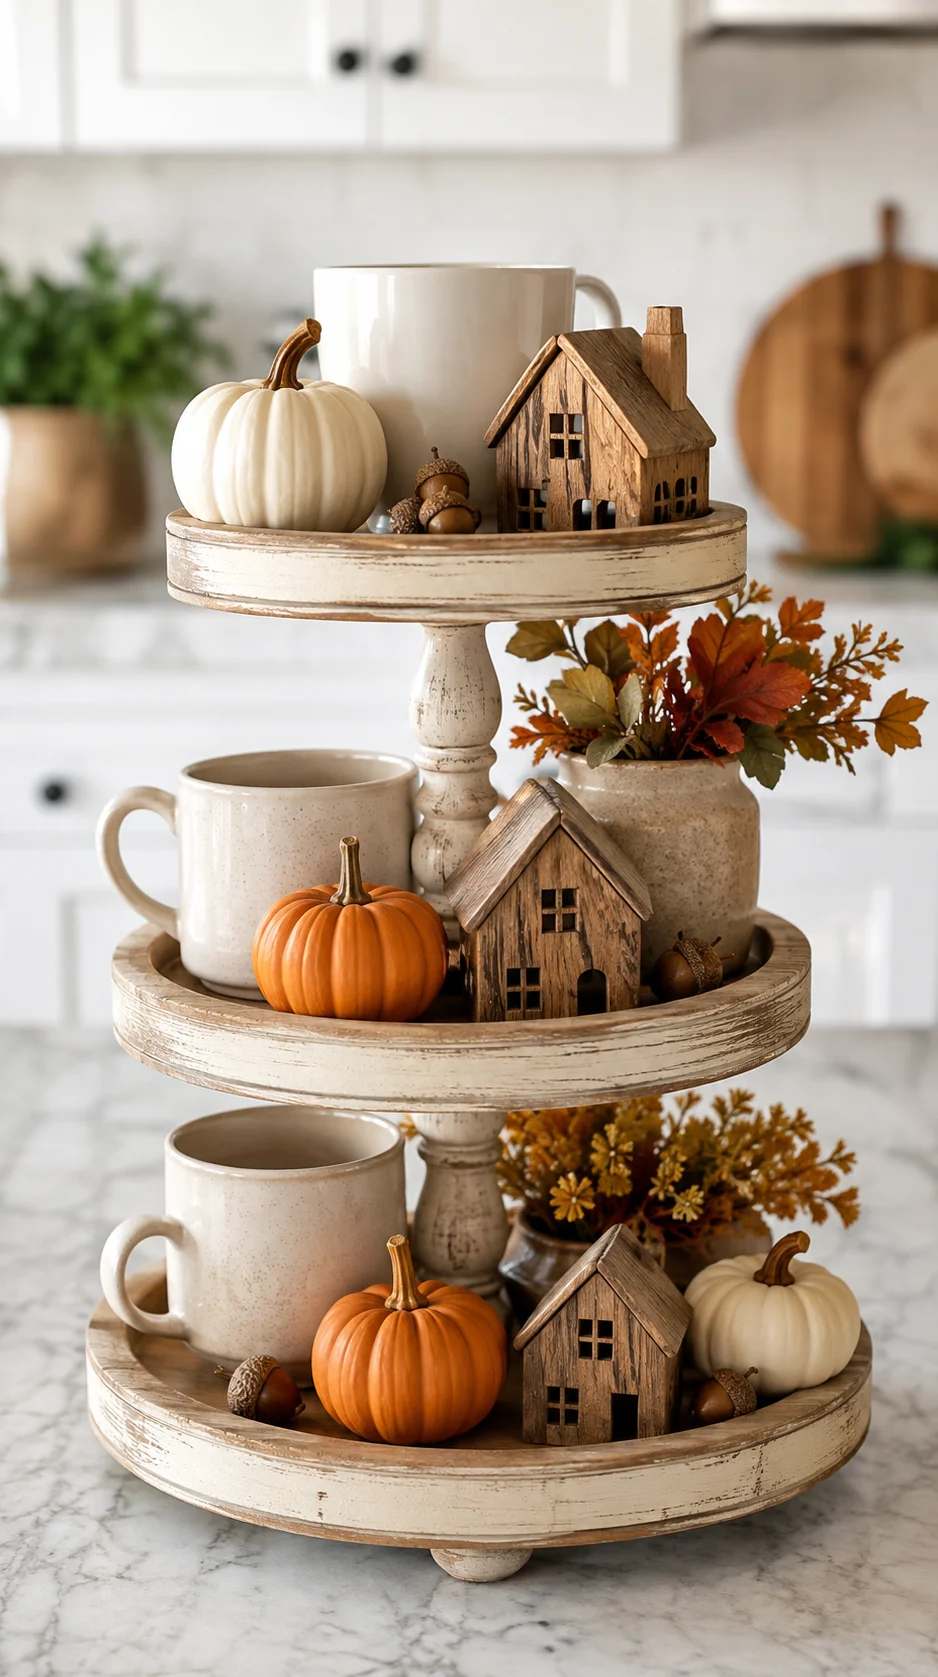 Cut two or three round or square wood platforms in decreasing sizes. Connect them with sturdy center supports, checking that every level remains straight and evenly balanced during assembly.
Finish the stand with warm stain, distressed cream paint, or matte black. Decorate the levels with lightweight pumpkins, acorns, tiny houses, wrapped treats, mugs, or small vases without exceeding the structure’s capacity.
13Turn Wood Shapes Into Oversized Acorns
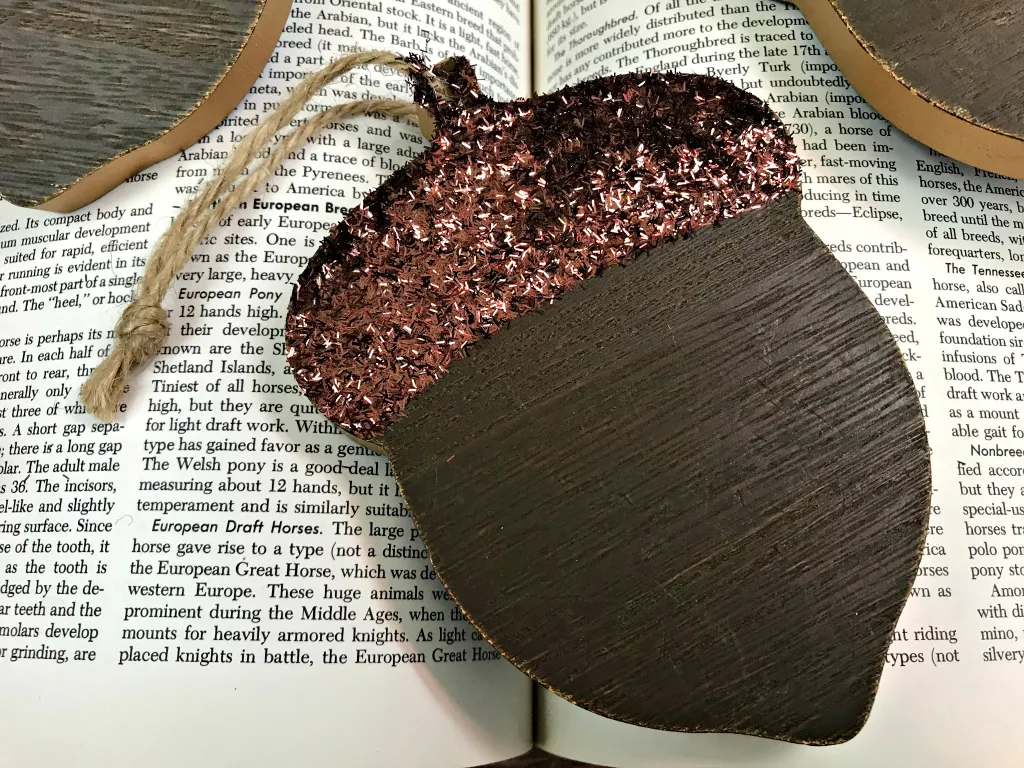 Cut an acorn body from a thick board or combine a rounded wood shape with a separate cap. Texture the cap with carved lines, small wood pieces, rope, or overlapping half-round beads.
Stain the body and paint the cap a contrasting color, or use two wood tones for a natural finish. Make a group of three in different sizes and display them on a mantel, console, or covered porch shelf.
Amazon find: Fall-Color Acrylic Craft Paint
A coordinated paint set is useful for pumpkins, signs, acorns, leaves, scarecrows, and small wooden houses.
14Make a Reclaimed Wood Scarecrow
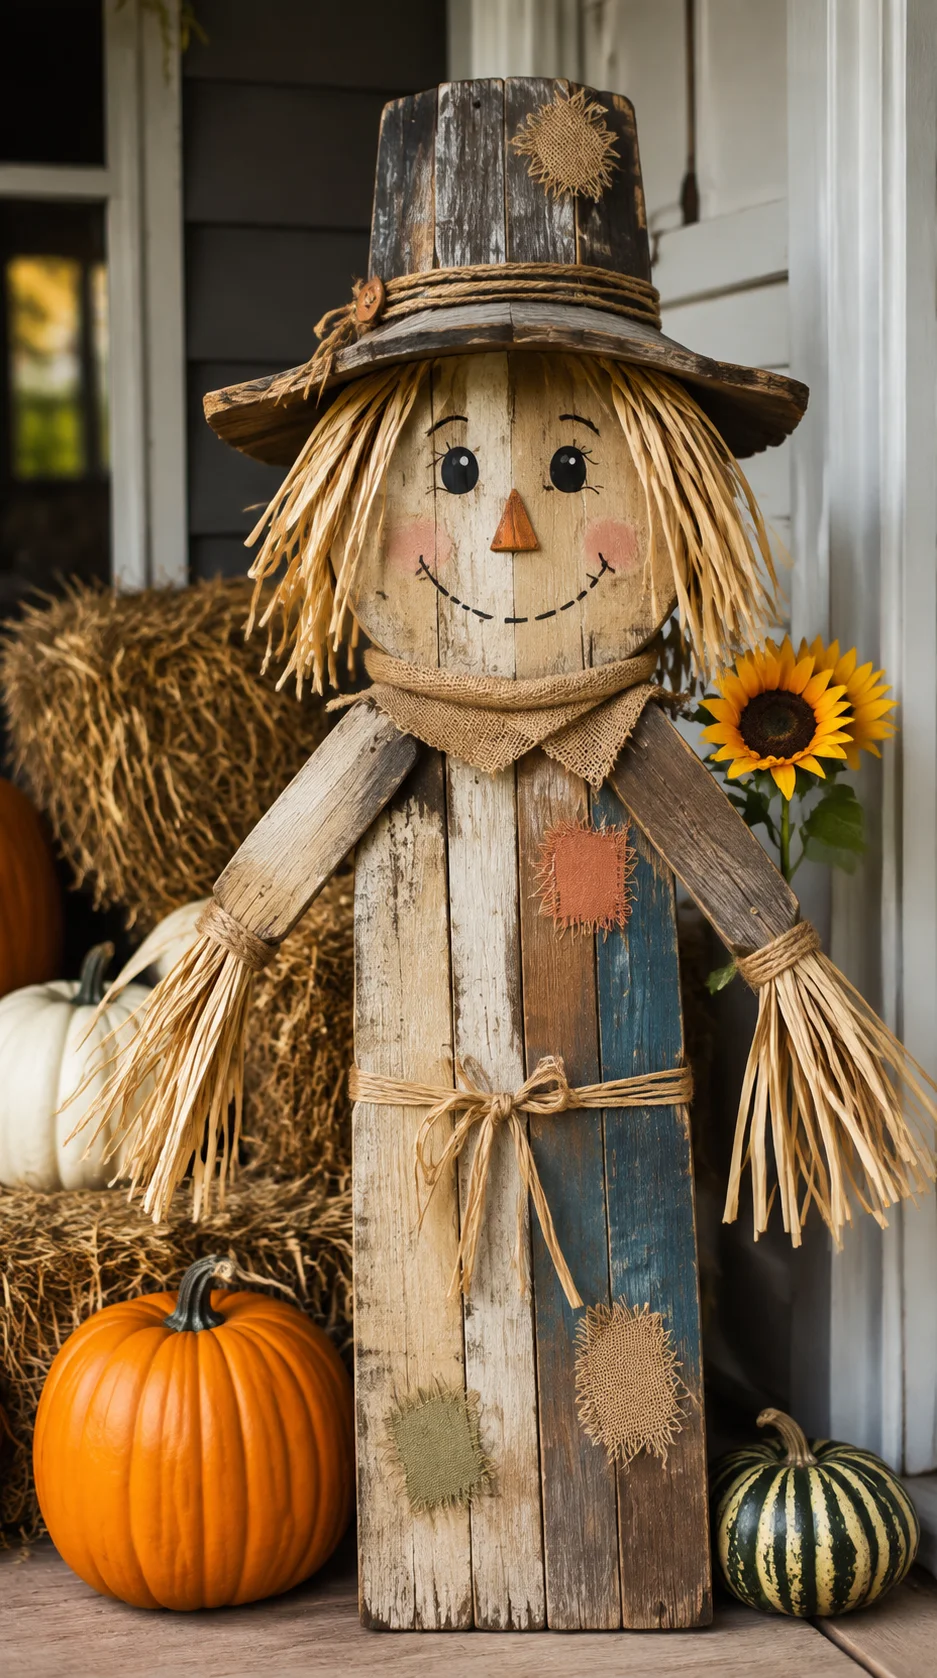 Use a rectangular board for the face and attach a separate wood piece across the top to suggest a hat brim. Paint simple eyes, a triangle nose, rosy cheeks, and a stitched smile with large features that can be seen from a distance.
Add raffia hair beneath the hat, a fabric patch, and one faux sunflower or leaf. Prop the finished scarecrow against a wall or install suitable hanging hardware for its weight and display location.
15Create a Wood Slice Candle Platform
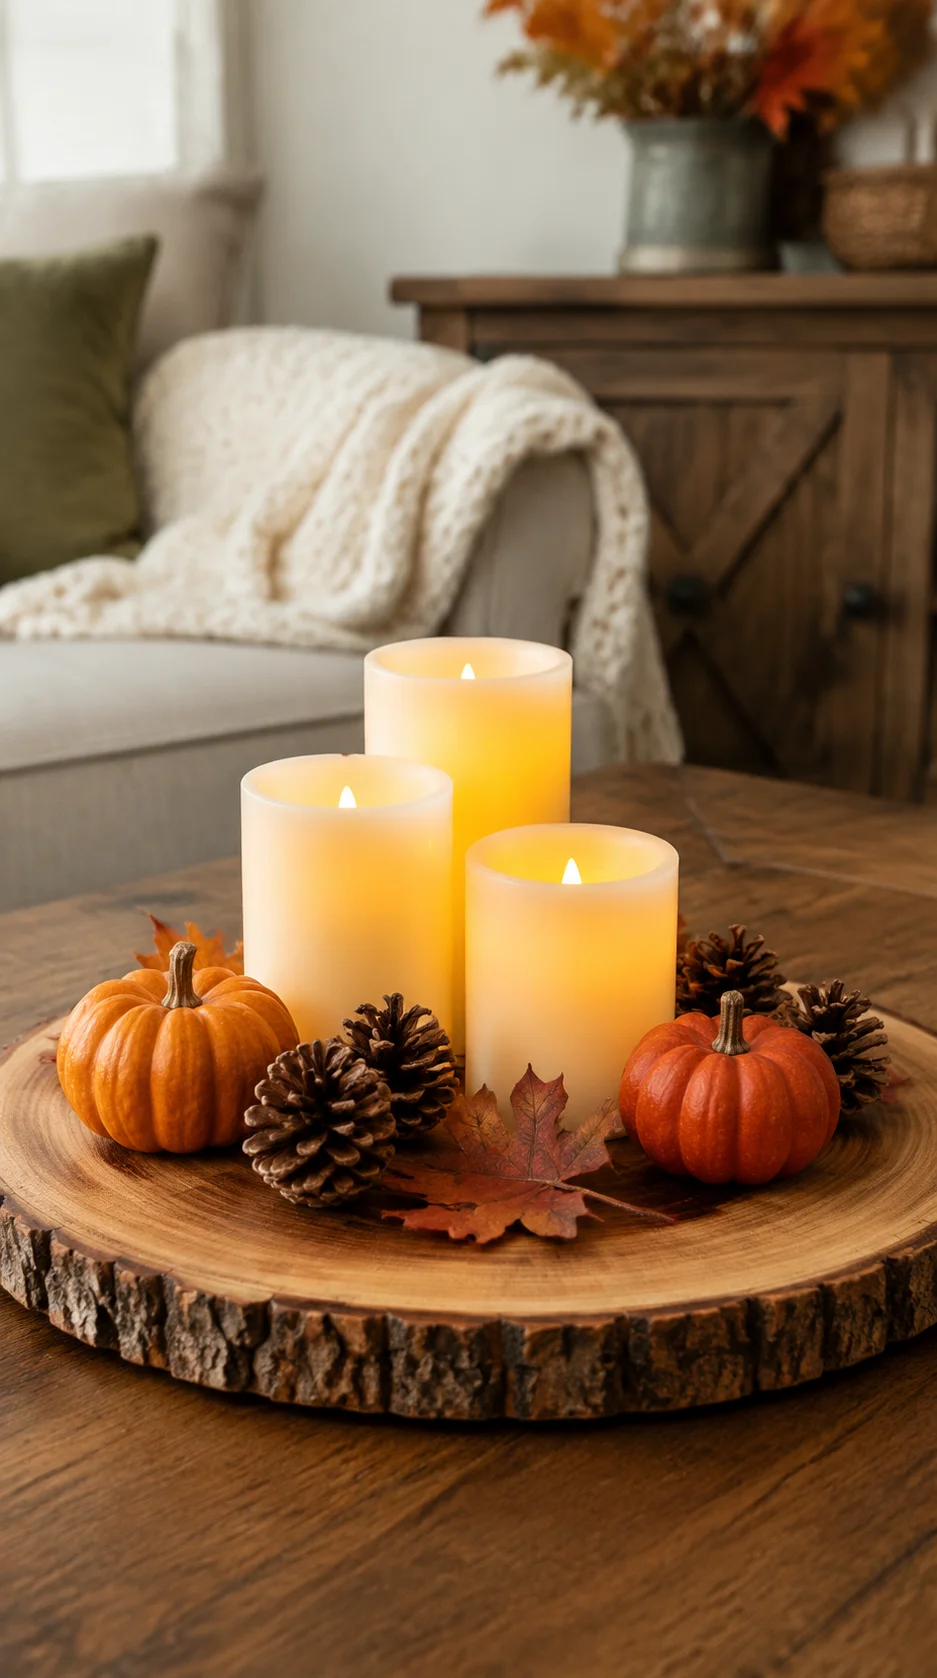 Sand a wide, dry wood slice until it rests steadily and feels smooth. Seal the bark only if it is secure and suitable for keeping; otherwise, remove loose sections before finishing the piece.
Use the platform beneath battery-operated pillar candles, miniature pumpkins, or a small vase. Add felt pads underneath to protect the table and improve stability on smooth surfaces.
16Build Pumpkin Patch Directional Signs
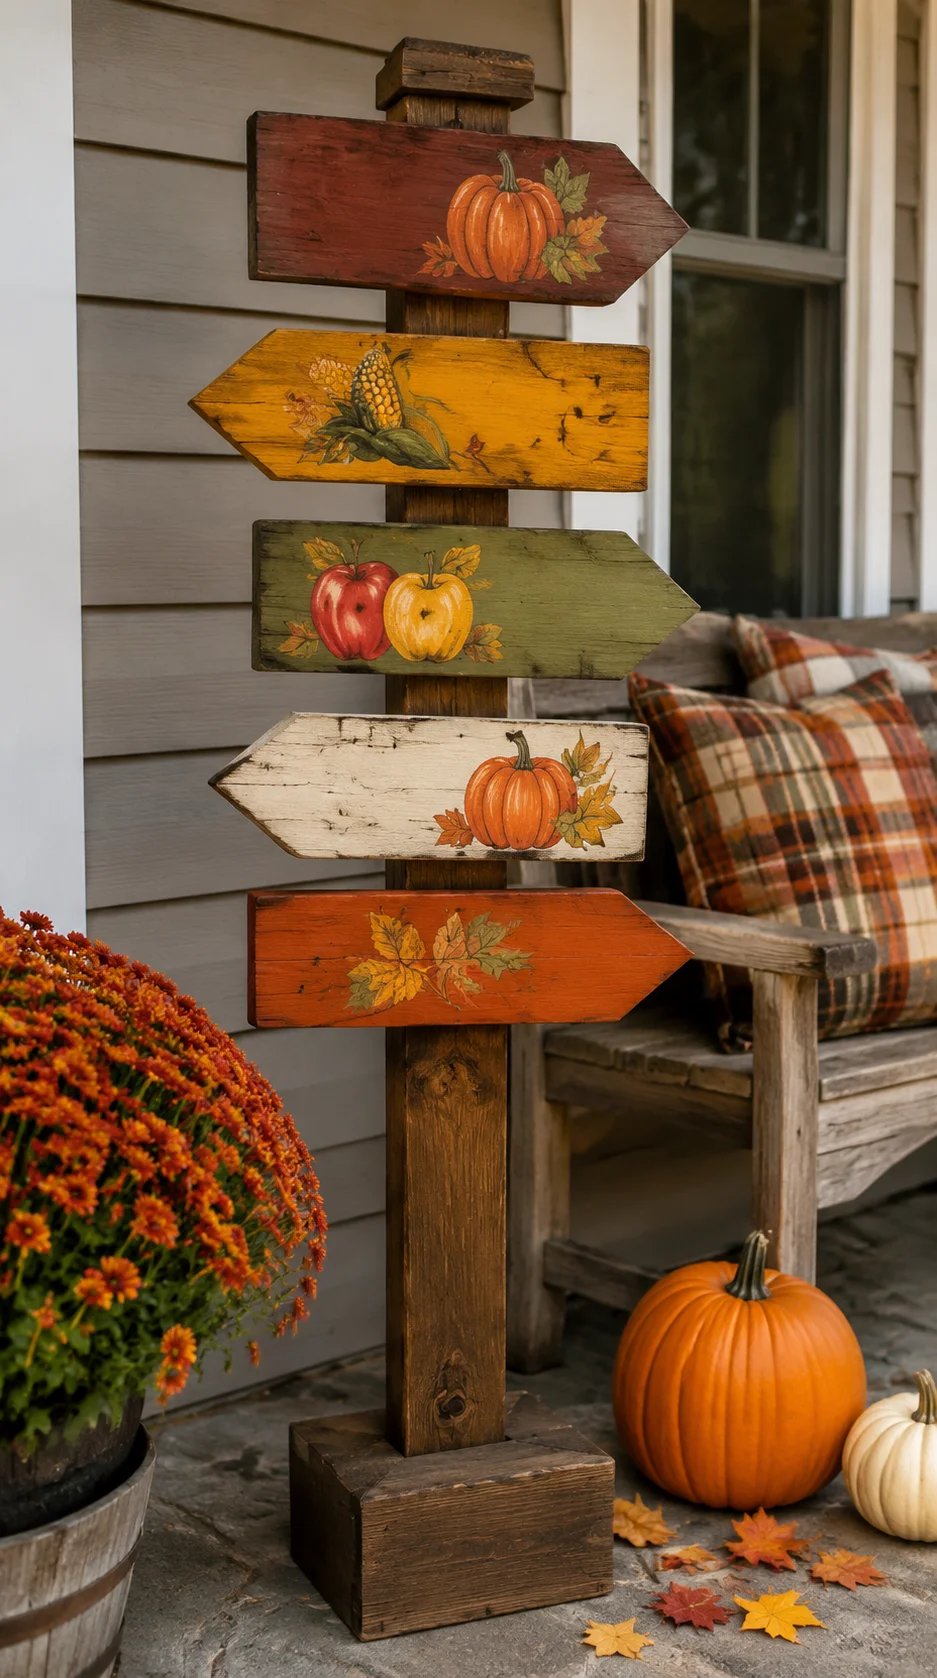 Cut several narrow boards with arrow-shaped ends and sand every corner. Attach the arrows to a sturdy wood post at slightly different angles, making sure the finished base can support the display safely.
Paint each arrow in a coordinated fall shade and add simple pumpkin, apple, corn maze, cider, or harvest illustrations. Use the finished piece on a covered porch or indoors beside an entry bench.
17Cut a Wooden Fall House Village
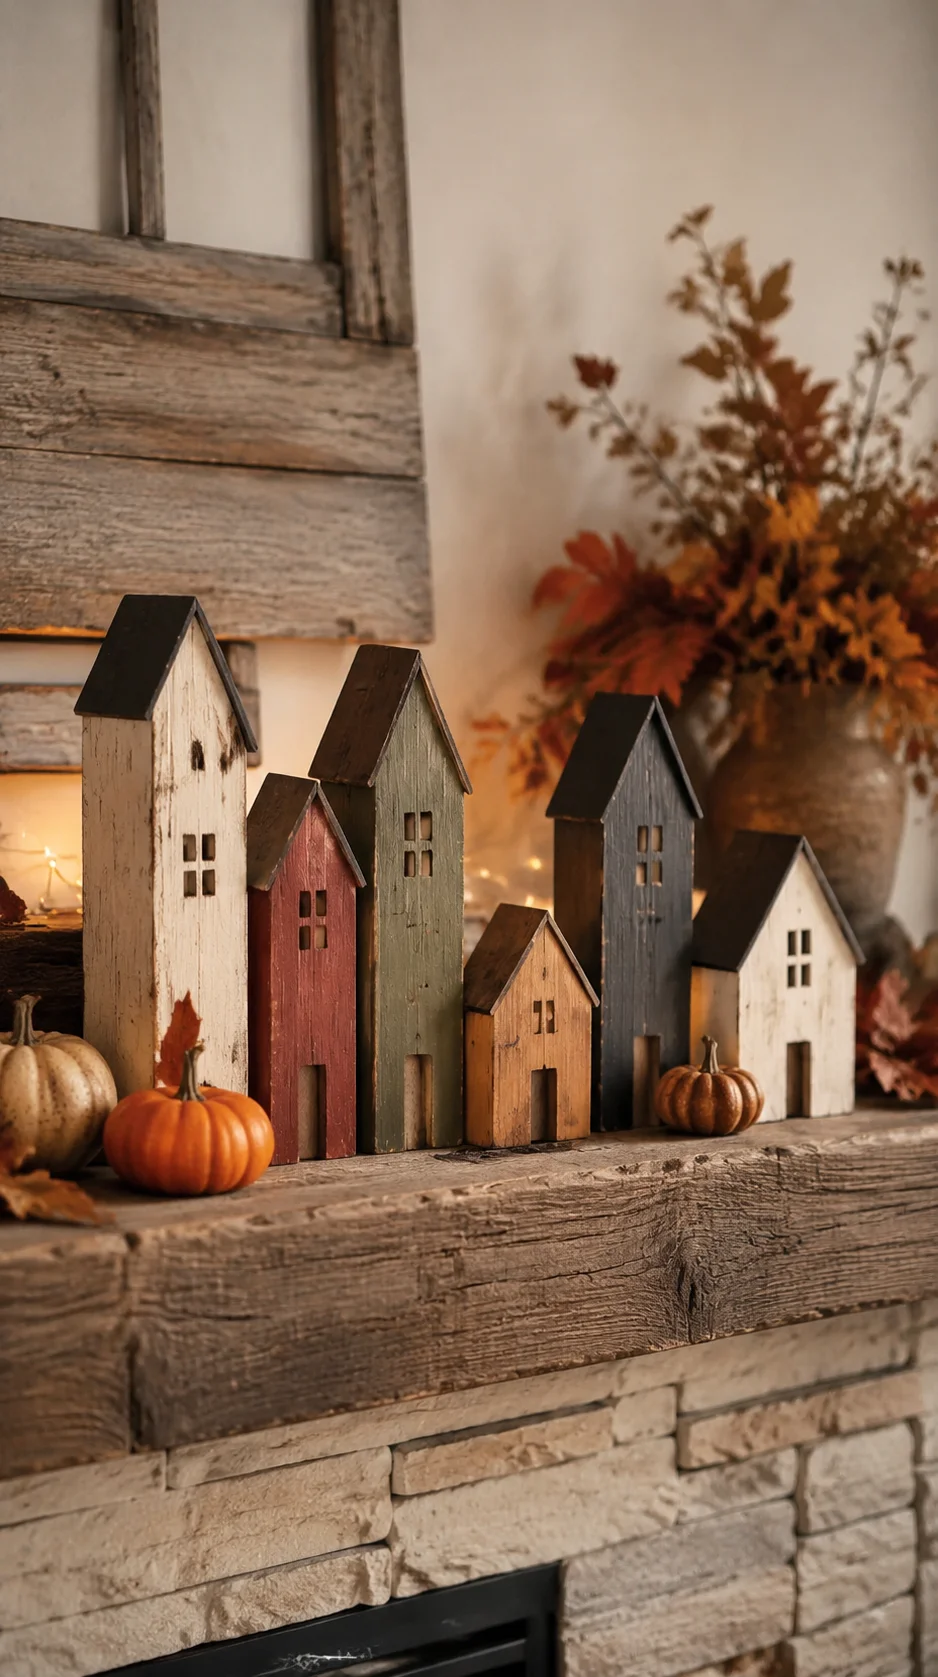 Cut scrap blocks into several house silhouettes with pitched or uneven roofs. Sand the faces and roof edges, then create doors and windows with paint, a stencil, or wood-burning tools used according to their safety instructions.
Paint the houses cream, rust, olive, brown, mustard, or charcoal. Arrange the village on a mantel or shelf with miniature pumpkins and warm battery lights placed behind, rather than inside, the solid wood houses.
Amazon find: Fine-Grit Sandpaper Assortment
A range of suitable grits helps smooth cut edges and prepare small wood crafts before paint, stain, or sealer.
18Create Leaf-Shaped Wall Hooks
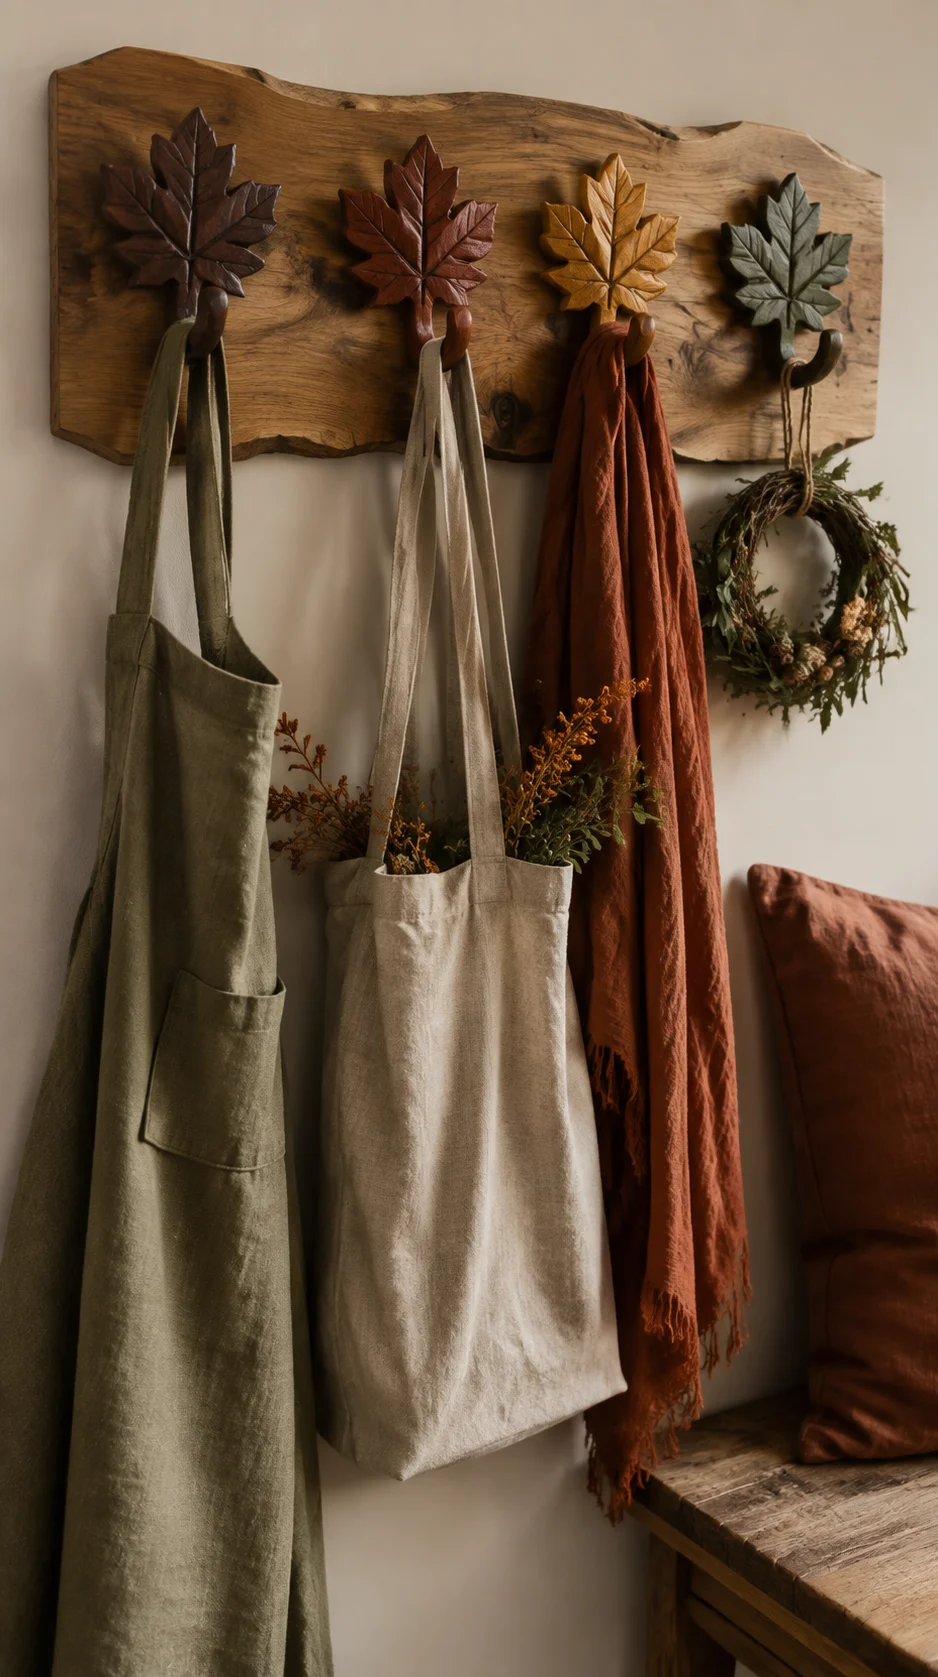 Cut several simple leaf shapes from a suitable wood board and sand their edges. Carve or paint veins across the surface, then attach hooks rated for the items you intend to hang.
Mount the leaves to a sturdy backboard or install them individually with appropriate wall anchors. Use them for lightweight seasonal items such as aprons, fabric bags, small wreaths, or scarves within the hardware’s limits.
19Build a Rustic Wood Pedestal Stand
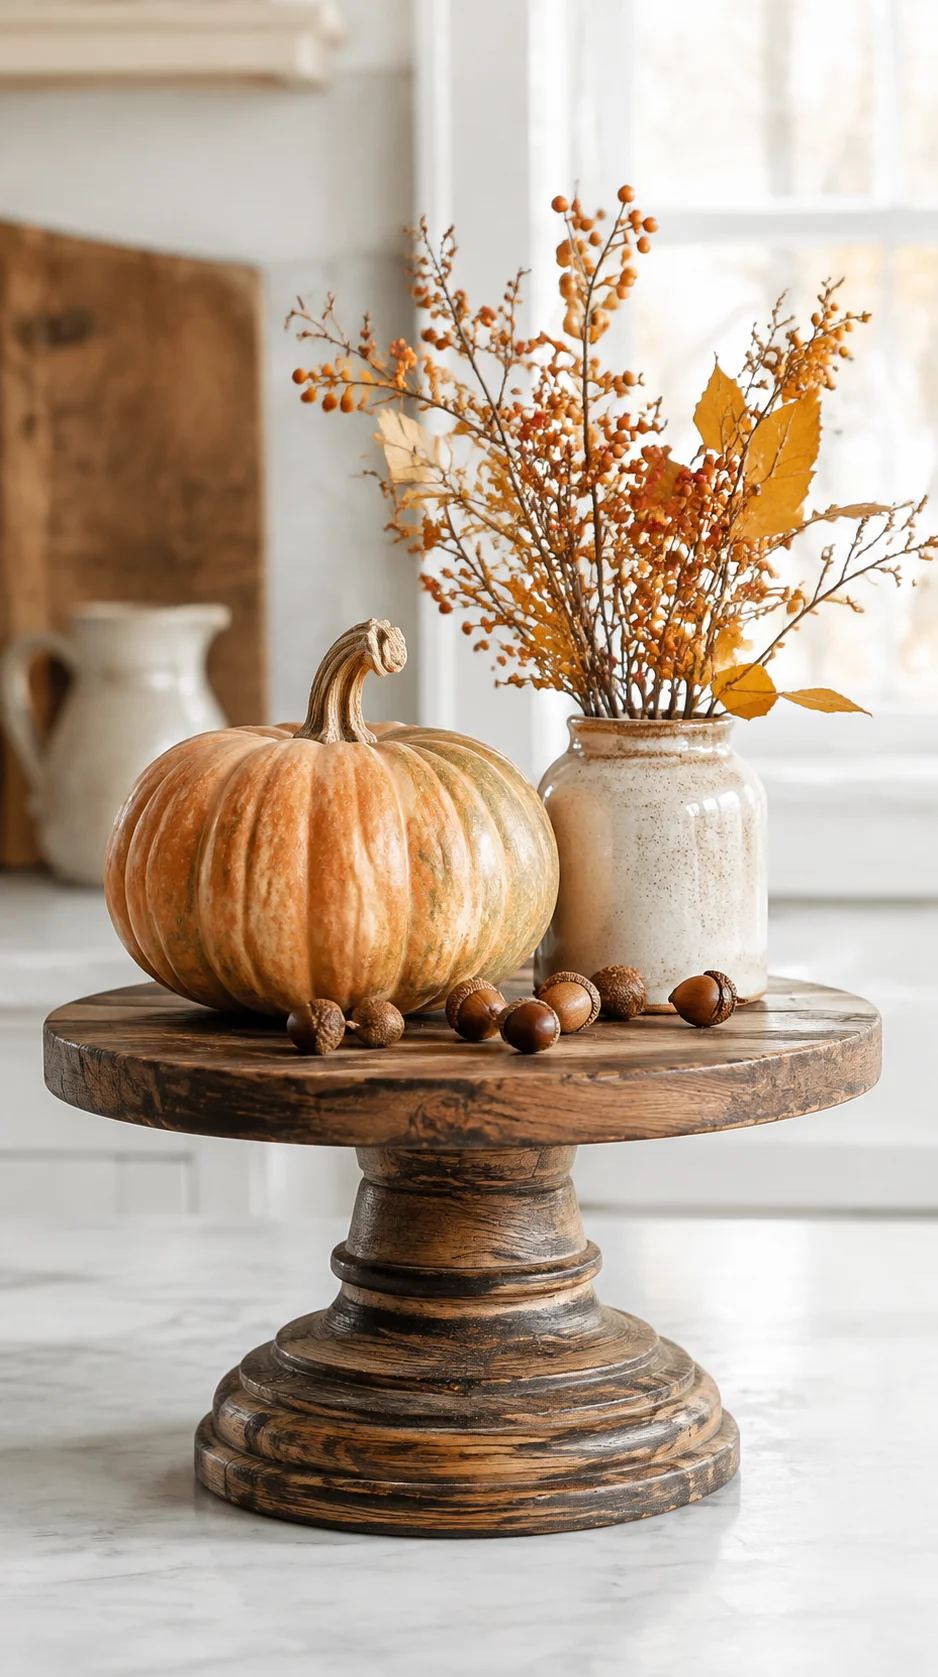 Attach a round or square wood top securely to a wide pedestal base. Keep the top proportionate to the base so the completed stand remains stable and does not tip when decorated.
Paint or stain the stand and use it to elevate a lightweight pumpkin, small plant container, flameless candle, or decorative bowl. Add felt pads beneath the base to protect counters and tables.
20Construct a Mini Wooden Wheelbarrow
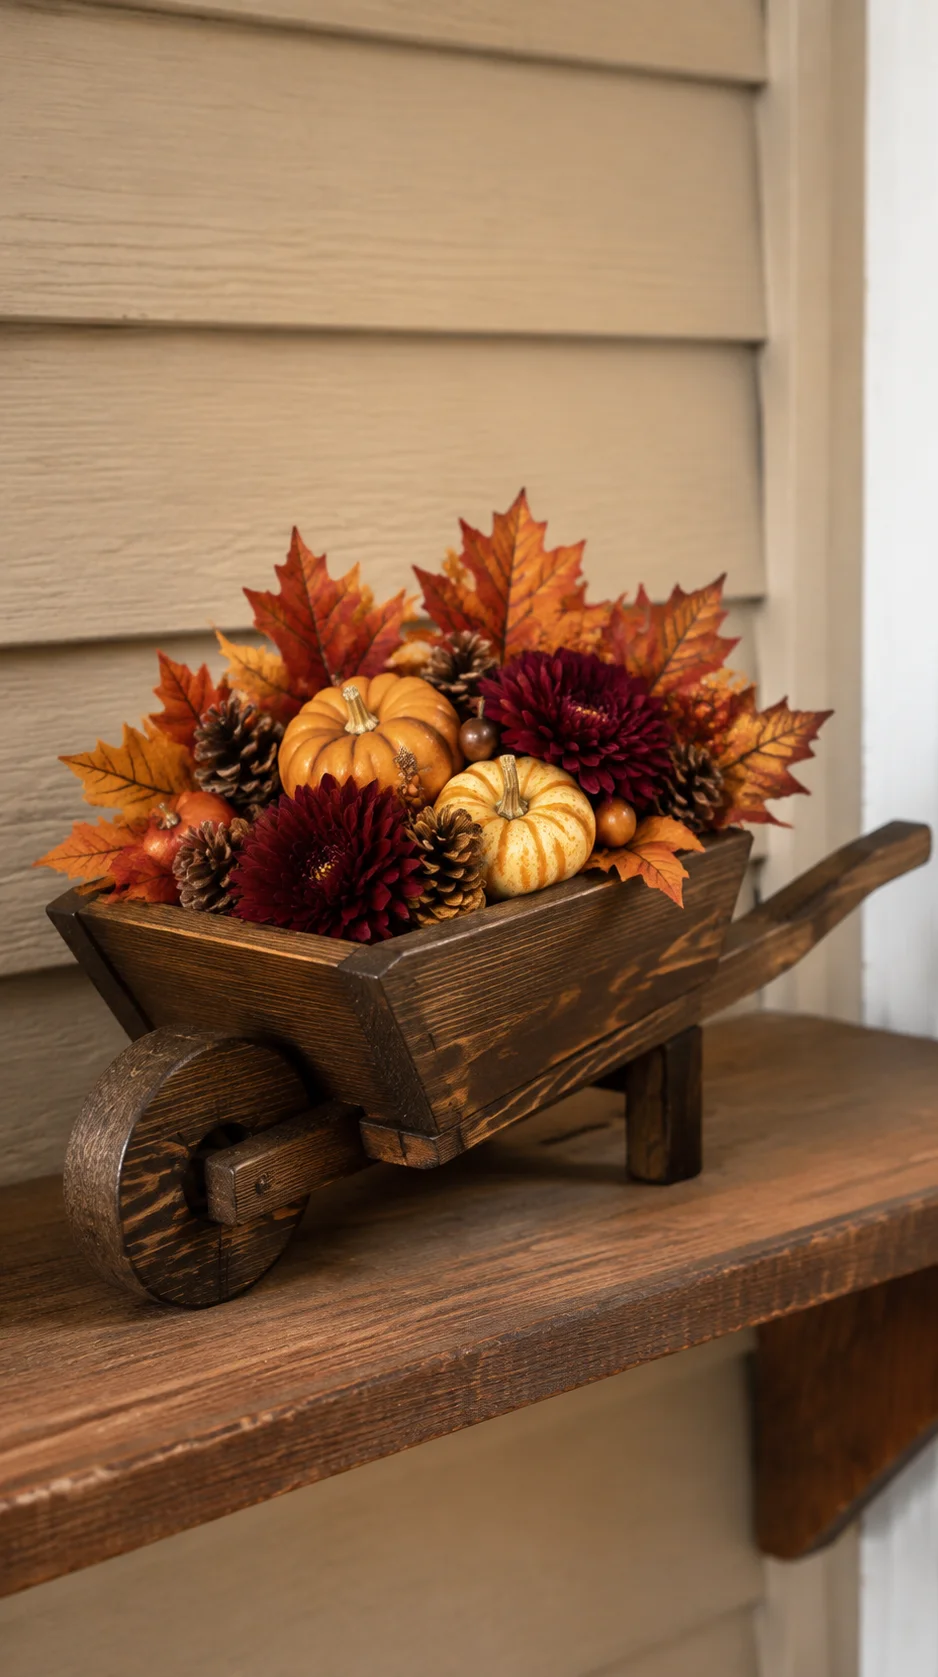 Build a small decorative wheelbarrow with a tapered box, two handles, short supports, and a wooden wheel. Use an appropriate plan to ensure that the parts align and the finished piece sits steadily.
Fill it with lightweight faux pumpkins, leaves, pinecones, or artificial flowers. Display it on a porch table, fireplace hearth, large entry console, or protected outdoor shelf.
21Build an Outdoor Pumpkin Planter Box
 Construct a sturdy outdoor planter or decorative sleeve sized for a removable nursery pot. Include drainage and use materials, fasteners, and finishes appropriate for exterior exposure if the wood will hold soil directly.
Decorate the front with a simple wood pumpkin, slatted pattern, or fall-colored paint. Fill the removable pot with mums, ornamental peppers, or another plant suited to your climate and light conditions.
Amazon find: Exterior Wood Sealer
A compatible exterior finish can help protect suitable outdoor wood projects from moisture and seasonal exposure when applied correctly.
How to Make DIY Fall Wood Decor Look Expensive
Careful preparation is more important than costly lumber. Square cuts, smooth edges, filled fastener holes, removed sanding dust, and thin, even finish coats can make an inexpensive project look professionally assembled.
Limit each project to two or three colors and allow some natural grain to remain visible. Pairing stained wood with one painted seasonal shape often looks more polished than covering every surface with bright color.
Use natural finishing details sparingly. A small velvet bow, leather loop, jute border, metal handle, or greenery cluster can add texture without hiding the woodworking. Conceal adhesive, trim loose fibers, and paint visible edges for a clean final result.
Simple High-End Finish Formula
Smooth preparation + one warm stain or muted paint color + subtle distressing + clean hardware + one natural accent
Fall Woodworking Shopping Checklist
| Item | Best For | Amazon Search |
|---|---|---|
| Woodworking square | Marking straight cuts and checking assemblies | Shop on Amazon |
| Sandpaper assortment | Smoothing cut edges and preparing surfaces | Shop on Amazon |
| Wood glue | Joining appropriate indoor wood components | Shop on Amazon |
| Small clamps | Holding boxes, frames, trays, and glued joints | Shop on Amazon |
| Acrylic craft paint | Painting indoor pumpkins, leaves, houses, and signs | Shop on Amazon |
| Wood stain | Adding warm color while keeping the grain visible | Shop on Amazon |
| Reusable fall stencils | Adding leaves, pumpkins, and harvest patterns | Shop on Amazon |
| Safety glasses | Protecting eyes during suitable workshop tasks | Shop on Amazon |
| Hearing protection | Reducing exposure to loud power tools | Shop on Amazon |
Best Color Palettes for Fall Wood Crafts
Burnt orange, mustard, warm brown, cream, and copper
Ivory, oatmeal, matte black, natural wood, and muted taupe
Moss green, walnut, mushroom brown, rust, and antique brass
Dusty rose, burgundy, faded orange, cream, and aged gold
Charcoal, terracotta, camel, warm white, and medium oak
Common Woodworking Mistakes and Safety Tips
- Skipping accurate measurements: Measure twice, mark clearly, and use a square before making cuts or drilling holes.
- Using damaged wood: Avoid boards with serious rot, active mold, insect damage, hidden metal, or uncertain chemical contamination.
- Ignoring tool instructions: Read the manufacturer’s manual and use each saw, drill, sander, or wood-burning tool only as designed.
- Working without eye protection: Wear appropriate safety glasses during cutting, drilling, sanding, and other tasks that produce debris.
- Using loose clothing near machinery: Secure long hair and avoid loose sleeves, jewelry, cords, and gloves that could become caught in rotating tools.
- Holding small pieces by hand: Use suitable clamps, jigs, supports, and safe procedures rather than placing fingers near cutting or drilling areas.
- Ignoring dust and fumes: Work with suitable ventilation and protection for the wood, dust, paint, stain, adhesive, or finish being used.
- Applying thick finish coats: Several thin coats usually dry more evenly and reduce drips, sticky areas, and trapped moisture.
- Using indoor finishes outside: Select materials, fasteners, adhesives, and coatings suitable for the project’s actual exposure.
- Using real candles near wood: Choose flameless lighting around wood, dried foliage, fabric, ribbon, and seasonal decorations.
- Assuming decor is structural: Decorative ladders, trays, crates, stands, and wheelbarrows should not carry people or heavy loads unless built from an appropriate structural plan.
Frequently Asked Questions
Which fall wood project is best for a beginner?
Stacked block pumpkins, painted wood slice ornaments, simple house blocks, and cutting-board signs are approachable starting projects. They use basic shapes and finishes without requiring complicated structural joints.
Can I make fall woodworking projects with scrap wood?
Yes, clean and structurally sound offcuts work well for pumpkins, houses, ornaments, mosaics, acorns, and small signs. Inspect every piece for hidden metal, rot, pests, chemical contamination, and severe cracks before using it.
Should I paint or stain fall wood decor?
Stain highlights the natural grain and suits rustic projects, while paint provides stronger seasonal color. You can combine both by staining the base and painting only a pumpkin, leaf, edge, or stencil detail.
How do I protect wood fall crafts used outdoors?
Use wood, fasteners, adhesive, paint, stain, and sealer suited to exterior exposure. Follow every product direction, protect end grain, provide drainage where needed, and move lightweight decorations inside during severe weather.
How can I give new wood a weathered appearance?
Apply a base stain or paint, let it dry, and lightly dry-brush a contrasting shade across selected areas. Sand only appropriate edges for subtle wear and test the complete finish on scrap wood before applying it to the project.
Final Thoughts
DIY fall woodworking projects can bring warmth, natural texture, and handmade character into every part of your home. A small scrap block can become a pumpkin, while a few carefully measured boards can become a centerpiece box, lantern, planter, or blanket ladder.
Start with a project that matches your current tools and experience. A simple ornament or block pumpkin can be completed quickly, while a wheelbarrow, tiered stand, or outdoor planter makes a satisfying weekend build.
Whatever you choose, take time to measure accurately, smooth the wood, use tools safely, and apply the finish in thin layers. These details will help your handmade fall decor look polished and last for many seasons.
1 thought on “21 Creative DIY Fall Woodworking Projects & Crafts”